Table of Contents
ToggleCraftsman style outdoor lighting strikes the perfect balance between function and beauty, bringing warmth and character to porches, pathways, and patios. Unlike trendy modern fixtures that fade in and out of favor, craftsman fixtures have stood the test of time because they’re built on honest design principles: visible joinery, quality materials, and proportions that feel right to the human eye. If you’re tired of generic outdoor lighting and want something that actually complements your home’s architecture, craftsman style delivers. Whether you’re installing fixtures on a new deck, updating a tired porch, or adding ambient lighting to a garden path, this guide walks you through the design fundamentals and practical installation steps.
Key Takeaways
- Craftsman style outdoor lighting emphasizes visible construction details, natural materials like bronze and copper, and warm light that creates a welcoming atmosphere rather than harsh brightness.
- Essential design elements include tapered posts, recessed glass panels, square or rectangular frames, and hardware details you can see and touch—avoid plastic bezels and fussy trim.
- Match your fixture finish to existing hardware on your home (oil-rubbed bronze, brass, or copper) to create visual cohesion and avoid mixing finishes that cheapen the overall effect.
- Proper placement anchors with entryway sconces at 60–66 inches from ground, uses subtle path lighting spaced 8–10 feet apart, and layers ambient accent lighting to create depth without over-illuminating.
- If you’re uncomfortable with 120-volt wiring, hire a licensed electrician; however, low-voltage landscape lighting (12-volt) is a manageable DIY project that doesn’t require permits in most areas.
- Invest in quality fixtures backed by solid warranties that won’t yellow or deteriorate—craftsman style outdoor lighting pays dividends through decades of reliable service and timeless appeal.
What Makes Craftsman Style Outdoor Lighting Distinctive
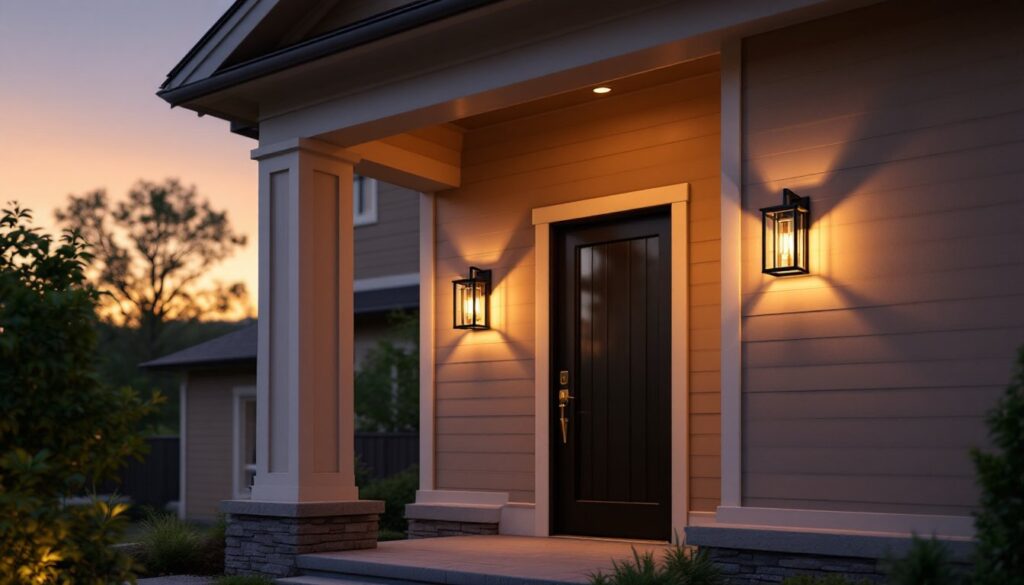
Craftsman lighting exists in the middle ground between ornate Victorian excess and stark modernism. It emphasizes visible construction details, you can see how the fixture is put together, rather than hiding them behind plastic or molded seams. The style favors natural materials like bronze, copper, brass, and glass over chrome or plastic.
A hallmark of craftsman design is proportion and restraint. Fixtures don’t scream for attention: they blend seamlessly with your home’s exterior while still being functional. You’ll notice clean lines, geometric shapes, and often geometric glass panels rather than frosted or decorative frou-frou. The result feels grounded and honest, a quality that resonates with homeowners who value durability and timeless aesthetics over chasing trends.
Craftsman lighting also typically uses visible bulbs or warm-toned glass that creates amber or soft white light. This isn’t about brightness alone: it’s about creating an inviting atmosphere that draws people onto your porch or patio. Compared to harsh white floodlights, craftsman fixtures encourage lingering and conversation.
Essential Design Elements of Craftsman Outdoor Fixtures
The most recognizable craftsman fixtures share several visual traits: tapered posts or brackets, recessed glass panels, and hardware details you can actually see and touch. Square and rectangular frames dominate the style, though you’ll also find subtle arches and gentle curves. No chrome, plastic bezels, or fussy trim.
Materials matter tremendously. Bronze and copper develop a natural patina over time, a greenish or brownish oxidation layer that only adds character. Unlike powder-coated aluminum, which can chip and look dated, real metal improves with age. Brass offers a warmer, more refined look, though it requires occasional polishing if you want it to stay shiny.
Glass in craftsman fixtures is typically clear or seeded (bumpy texture that diffuses light naturally), never amber-tinted or decoratively frosted. This clarity shows off the fixture’s internal structure and allows warm light to project evenly.
Material Choices and Finishes
When selecting fixtures, match your finish to your home’s existing hardware. If your front door has oil-rubbed bronze handles and hinges, your sconces should too. Mixing finishes (bronze with brass, or brushed nickel with copper) creates visual confusion and cheapens the overall effect.
Solid brass fixtures cost more upfront but age beautifully and last decades. Bronze and dark oil-rubbed finishes hide oxidation and fingerprints better outdoors. Copper develops a striking green patina, gorgeous if you want character, but requires maintenance if you prefer polish.
Glass panels should be either clear or seeded glass (which scatters light softly). Frosted or milk glass feels less authentic to the craftsman aesthetic and doesn’t showcase the fixture’s internal structure. For outdoor fixtures exposed to weather, ensure glass is tempered and gaskets are silicone-based, not rubber, rubber degrades in UV light.
Popular Craftsman Outdoor Lighting Styles for Your Home
Mission style is the strictest interpretation of craftsman principles, think heavy, geometric, and almost austere. Fixtures are bulky by modern standards, with square frames and minimal ornamentation. Ideal if your home is a historic Craftsman bungalow or a modern build that borrows from that heritage.
Arts and Crafts lighting is slightly more decorative than Mission but still grounded. You’ll find gentle curves, subtle glazed glass, and more generous proportions. This works beautifully on Colonial revivals, 1970s ranch homes, or contemporary houses with character.
Prairie style, influenced by Frank Lloyd Wright, features horizontal lines and overhanging eaves that echo a structure’s architecture. These fixtures often have copper or brass with art glass panels, more expensive but strikingly beautiful.
When browsing, look for fixtures with visible sockets, actual glass panels (not plastic), and hardware you can touch. Avoid anything that looks plastic-y or has glued seams instead of screwed joints. You’re investing in something that should outlast trends, so prioritize build quality over bargain pricing. Many excellent craftsman fixtures cost $150–$400 per piece, but they’re backed by solid warranties and won’t yellow or deteriorate like cheaper alternatives.
Placement Strategies for Maximum Impact and Function
Good outdoor lighting serves two purposes: function (safely lighting stairs, paths, and entryways) and atmosphere (creating a welcoming ambiance). Craftsman fixtures excel at both when placed thoughtfully.
Entryway and porch lighting is the anchor. A pair of wall-mounted sconces flanking your front door creates symmetry and frames the entry. Mount them at eye level, roughly 60–66 inches from the ground to the center of the fixture, so you can actually see people approaching. Avoid mounting them so high they cast shadows downward onto faces.
Path and step lighting should be subtle but functional. Smaller post lights (also called bollards) spaced 8–10 feet apart illuminate walkways without creating harsh shadows. You can also use low-voltage landscape lighting to graze edges of pathways or planting beds. Lower-wattage fixtures (20–40 watts) prevent glare and create softer shadows.
Patio and deck overhead lighting typically uses pendant fixtures or a chandelier-style fixture mounted to a porch ceiling or pergola. Position pendants 7–8 feet above seating areas so light spreads evenly without glaring into eyes. If your ceiling is lower (8–9 feet), go with flush-mount fixtures or semi-flush styles.
Ambient accent lighting can highlight architectural features, soffit details, stone work, or plantings. Small adjustable fixtures or uplights tucked into landscaping create depth and draw the eye upward, making spaces feel larger and more intentional.
Start with one anchor fixture (usually the entryway sconce) and layer from there. Avoid over-lighting: dim, warm bulbs create more atmosphere than bright white ones.
DIY Installation Tips and Practical Considerations
Installing outdoor lighting fixtures requires working with electricity, so honesty first: if you’re not comfortable with 120-volt wiring, hire a licensed electrician. Most jurisdictions require electrical permits and inspections for new circuits. This isn’t a place to cut corners.
If you’re replacing an existing fixture or adding a fixture to an existing outdoor outlet, the work is simpler. You’ll still need to turn off power at the breaker and test the circuit with a non-contact voltage tester before touching anything.
Materials and tools you’ll need:
- Voltage tester (non-contact type, ~$12)
- Wire stripper
- Screwdrivers (Phillips and flathead)
- Adjustable wrench or socket set
- Level
- Drill with bits
- Safety glasses and work gloves
- Weatherproof silicone caulk
Installation steps for wall-mounted sconces:
- Turn off power at the breaker. Verify power is off using your voltage tester.
- Mark fixture positions using a level and painter’s tape. Symmetry matters, measure from the door centerline outward.
- Drill mounting holes into the wall studs when possible (they’re typically 16 inches on center). If you’re on siding or stucco, use heavy-duty anchors rated for outdoor use.
- Install the mounting bracket, ensuring it’s level and securely fastened.
- Connect the fixture’s wires to your home’s electrical box using wire connectors (the small plastic caps). Strip about ½ inch of insulation from each wire, twist like wires together, and screw the connector clockwise until snug. Never use electrical tape alone, connectors are required by code.
- Seal any gaps around the bracket with weatherproof silicone caulk to prevent water intrusion.
- Install the fixture body onto the bracket, then add the glass panels and weatherproof bulbs (typically LED A19 or ED17 shapes in 2700K color temperature for warm light).
- Test the fixture by restoring power and flipping the switch.
For low-voltage landscape lighting (much easier DIY work):
Low-voltage systems (12-volt) are safer and don’t require permits in most areas. You plug a transformer into an outdoor outlet, then run low-voltage wire along pathways to post lights or in-ground fixtures. These systems are forgiving, if you nick the wire, you won’t get shocked. Most homeowners can handle this in an afternoon without calling an electrician.
Critical safety reminders:
- Always test circuits before working on them
- Use GFCI-protected outlets for any outdoor wiring
- Seal fixture connections with weatherproof silicone to prevent rust and water damage
- Wear safety glasses when drilling or working overhead
- Never attempt work you’re unsure about: call a pro
Outdoor fixtures experience temperature swings, moisture, and UV exposure. Use fixtures rated for wet locations and bulbs with appropriate IP ratings. Expect to re-caulk and inspect connections every 2–3 years, especially in harsh climates.
Conclusion
Craftsman style outdoor lighting delivers lasting beauty and honest function. By choosing quality fixtures with visible joinery and natural finishes, then placing them strategically around entryways and pathways, you’ll create spaces that are both safer and more inviting. The investment in good fixtures pays off through years of reliable service and timeless appeal that doesn’t require trendy updates. Whether you’re tackling wiring yourself or calling in a professional, the principles remain the same: prioritize materials, respect proportions, and let warm light work its magic on your outdoor spaces.


