Table of Contents
ToggleLandscape lighting transforms your yard from an invisible void after dark into a welcoming extension of your home. It’s not purely decorative, strategic lighting improves safety along walkways, highlights architectural features, and extends the hours you can enjoy your outdoor space. Whether you’re planning a complete overhaul or adding a few accent lights to existing beds, understanding the fundamentals of fixture types, design principles, and installation will set you up for success. This guide covers everything a DIYer needs to know to create professional-looking outdoor lighting without hiring a landscape architect.
Key Takeaways
- Beautiful landscape lighting transforms your outdoor space into a functional and visually striking extension of your home by improving safety, security, and aesthetic appeal after sunset.
- Landscape lighting fixtures fall into three main categories—path lights, accent lights, and uplights—each serving a specific purpose and requiring strategic placement to create depth and visual interest.
- Effective landscape lighting design relies on layering different light types, creating focal points with selective illumination, and using warm white light (2700K) to avoid glare and maintain a cohesive aesthetic.
- Plan your landscape lighting layout by mapping your yard, prioritizing safety along entry points and walkways first, then identifying accent and focal point opportunities before purchasing any fixtures.
- DIY installation is achievable with 12-volt low-voltage systems that require only basic tools, simple connectors, and shallow trenching—costing between $300–$800 for most residential yards.
- Regular maintenance of your landscape lighting system involves checking connections yearly, clearing debris from lenses, and adjusting fixtures as plants grow to preserve optimal light coverage and performance.
Why Landscape Lighting Matters for Your Home
Good outdoor lighting does triple duty: it makes your home safer, more inviting, and more visually striking after sunset. Pathways and steps lit with low-level fixtures prevent trips and falls, especially in wooded or uneven terrain. Security lighting around entry points and dark corners deters unwanted visitors, and even if it doesn’t, it gives you better visibility and peace of mind.
On the aesthetic side, lighting highlights the bones of your landscape. A well-placed uplight on a specimen tree becomes a focal point visible from inside your home. Accent lighting on a stone retaining wall or custom fence draws the eye and creates depth. These aren’t expensive add-ons, they’re force multipliers for landscaping you’ve already invested in. Without lighting, a $5,000 landscape disappears when the sun dips: with it, that same landscape becomes a year-round outdoor room.
Types of Landscape Lighting Fixtures Every Homeowner Should Know
Landscape lighting fixtures aren’t one-size-fits-all. Each type serves a specific purpose, and mixing them thoughtfully creates depth and interest. Understanding the main categories helps you plan a cohesive layout without overbuying or underutilizing fixtures.
Path and Accent Lights
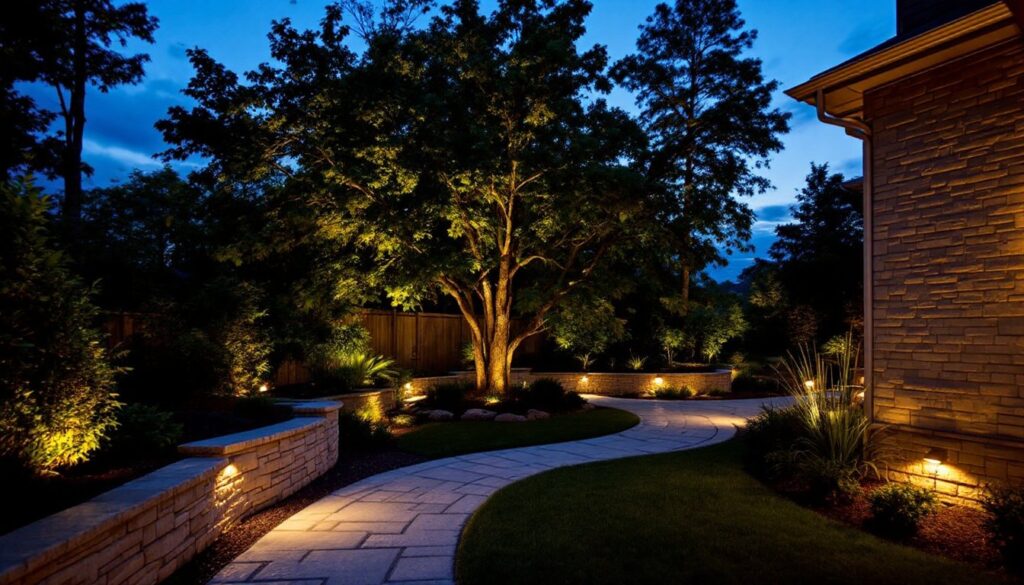
Path lights are the workhorses of landscape lighting. These 12–24 inch tall fixtures mount at ground level along walkways, driveways, and garden beds. They cast a soft downward glow that’s bright enough to light your way without blinding you. Most run on 12-volt low-voltage systems, which are far safer and cheaper to install than line-voltage (standard 120V household) wiring. Look for fixtures with a dark sky compliant design, they shield the light source so it doesn’t spill upward and create light pollution.
Accent lights are smaller, more focused versions designed to highlight plants, hardscape details, or architectural elements. A spotlight has a tighter beam than path lights and works best on shrubs, columns, or textured walls. Accent lights are usually installed at ground level, aiming upward at 15–45 degrees to create shadow and drama without washing out the subject.
Spotlights and Uplights
Spotlights and uplights are the same fixture with different names and angles. Technically, a spotlight shines horizontally or downward to highlight an area or object, while an uplight shines upward from ground level. Both typically have a narrower beam (15–40 degrees) than path lights, concentrating light on a specific focal point. They’re perfect for drawing attention to mature trees, stone features, water elements, or house architecture.
Uplighting a 25-foot tree from 3–6 feet away creates a dramatic silhouette at night. Hardscaping with landscape uplighting can turn a modest garden wall into a visual anchor. Spotlights are slightly more versatile because you can angle them but you want, some folks use them to graze light across a textured wall, creating shadow and dimension. Both types are typically more expensive than path lights but last longer and create the biggest visual impact.
Design Principles for Creating Stunning Outdoor Lighting
Good outdoor lighting design follows a few core principles borrowed from architectural and landscape lighting professionals. You don’t need a degree to apply them: they’re just habits of thinking about light, shadow, and hierarchy.
Layer your light. Use a mix of path, accent, and uplighting to create depth. If you only light walkways, your yard feels flat and utilitarian. If you only uplight trees, the ground becomes a tripping hazard. Combine them: path lights guide movement, accent lights frame planting beds, and uplights anchor focal points.
Create focal points. Your eye naturally travels to the brightest object in a dark space. Choose one or two architectural or landscape elements to emphasize, a specimen tree, the house facade, an arbor, a water feature, and give them slightly more light or a tighter beam. Everything else plays a supporting role.
Watch for glare and spillover. A fixture pointed directly at eye level is annoying and unsafe. Aim lights downward or shielded so the bulb itself isn’t visible from your seating areas. This is why dark-sky compliant fixtures matter: they’re designed to direct light where you want it without flooding your neighbor’s window or the sky.
Respect the color of light. Warm white (2700K color temperature) feels cozy and is flattering for most landscapes and house colors. Cool white (4000K+) is brighter and more clinical: use it sparingly or only for functional areas like driveways. Avoid oversaturated color-changing lights unless you’re going for a specific theme, they often look gimmicky in daylight.
Scale fixtures to your space. A 24-inch path light looks proportional in a suburban yard: in a small urban garden, it might overwhelm the space. Conversely, tiny ornamental lights get lost in a large landscape. Match fixture size to your hardscape and planting scale.
Planning Your Landscape Lighting Layout
Before you buy a single fixture, walk your yard at dusk and identify what you want to light. Bring a flashlight or phone light and experiment with angles and positions. This 15-minute exercise beats weeks of regret.
Start with a map. Sketch your yard roughly to scale on graph paper or use a digital tool, the Lighting Layout Tool can help you visualize placement. Mark your house, major plants, pathways, seating areas, and any architectural features. This doesn’t need to be a professional drawing: it’s a reference.
Identify your priorities. Safety comes first: light all entry points and main pathways to at least 1–2 foot-candles of light (about the brightness of a desk lamp). Next, mark accent opportunities, specimen trees, attractive walls, garden beds. Finally, optional focal points like water features or sculpture.
Plan your electrical route. Most DIY landscape lighting uses 12-volt low-voltage systems, which run from a transformer plugged into an outdoor outlet (GFCI protected). Mark the path from that outlet to your fixtures. Low-voltage wire can be buried 4–6 inches deep or concealed under mulch: plan your layout so cables don’t cross high-traffic areas or future planting zones.
Calculate fixture count and spacing. Path lights typically go 6–8 feet apart on walkways: closer spacing creates a more dramatic “runway” effect, wider spacing is more subtle. Accent lights depend on the size of what you’re lighting, a 5-foot shrub might need one 20-degree spotlight, while a 30-foot tree might need two or three uplights positioned 120 degrees apart around its base.
Budget realistically. A small kit with transformer, 50 feet of wire, and 6 path lights runs $80–150. Larger layouts or higher-end fixtures (brass or stainless steel) climb quickly. Most DIYers spend $300–800 for a complete yard. Materials from reputable outdoor lighting brands typically outlast cheap big-box fixtures by years: outdoor lighting ideas and regional design inspiration (Southern Living for regional styles) offer real-world examples of what works.
DIY Installation Tips for Landscape Lighting
Installing landscape lighting is genuinely a DIY-friendly project. Most systems are modular, low-voltage, and forgiving. Here’s the realistic workflow:
Prep and layout. Lay out all fixtures in their planned positions (use stakes or chalk) and lay the low-voltage cable in a dry run. This is your chance to catch problems before digging. Mark the cable path and any obstacles.
Dig shallow trenches. Using a narrow spade or trenching tool, cut a 4–6 inch deep groove from the transformer to each fixture location. You don’t need a trench so deep that future digging becomes impossible, but deep enough to avoid damage from lawn mowers and garden work. Alternatively, run cable along fence lines or under mulch, burial is optional if the wire is protected.
Install the transformer. Place the 12-volt transformer near your power source (outdoor outlet, ideally GFCI protected). If it’s more than 50 feet from your farthest fixture, you may need a heavier gauge wire to avoid voltage drop. Follow the transformer’s manual for wire connections, most use simple plug terminals with no soldering required.
Connect fixtures to the main wire. Most low-voltage fixtures use simple snap-in connectors or twist terminals. Strip about 1 inch of insulation from the cable ends, insert into the fixture connector, and lock it down. No special tools needed. If you must strip wire, use a wire stripper, not a knife, you risk cutting through the insulation or the conductor itself.
Bury cable and stake fixtures. Once everything is connected and tested (turn on the transformer to check all lights), push the cable into its trench and backfill with soil. Drive landscape lighting stakes (usually 5–7 inches long) firmly into the ground, securing each fixture. The stake should be stable enough that a light tug doesn’t uproot it.
Safety and code notes. Use only GFCI-protected outdoor outlets for your transformer. Bury low-voltage cable at least 4 inches deep to avoid accidental damage. While low-voltage systems don’t require electrical permits in most jurisdictions, check your local code, some areas require permits for any landscape work. If you’re trenching near buried utilities, call your local call-before-you-dig service: it’s free and prevents catastrophe.
Test and adjust. Turn everything on after dark and walk your landscape. Adjust angles, tighten loose fixtures, and reseat any connections that are corroding. Outdoor track lighting and other modular systems offer flexibility if you need to relocate or expand later. For more lighting secrets on fine-tuning your scheme, reference design-focused resources or explore lighting archives for updates as technologies and styles evolve.
Maintenance. Low-voltage LED fixtures are virtually maintenance-free, but check connections yearly for corrosion and replace any cracked lenses. Clear mulch or soil buildup that buries the fixture’s lens. Adjust trees and shrubs as they grow so they don’t block light paths.


