Table of Contents
ToggleYour deck is an investment in outdoor living, a space where family gathers, friends linger, and memories happen. When the sun sets, that potential evaporates unless you’ve got proper lighting. LED deck lighting changes the game. It’s energy-efficient, long-lasting, and comes in designs that work with any deck style. Whether you’re building a new deck or upgrading an existing one, the right lighting transforms your outdoor space into a functional, inviting retreat that extends your home’s living area well into the evening.
Key Takeaways
- LED deck lighting uses 75% less energy than traditional incandescent bulbs while lasting 25,000 to 50,000 hours, delivering long-term savings on electricity and replacement costs.
- Low-voltage LED systems (12V or 24V) are safer for DIY installation in many areas and typically don’t require a licensed electrician or permit, though local codes should always be checked first.
- Recessed and under-rail LED fixtures provide sleek, minimal aesthetics while improving safety by illuminating steps and deck edges without drawing attention to the light source itself.
- Post cap lights and solar LED options offer the easiest DIY setup, with solar-powered fixtures providing maintenance-free accent lighting when positioned in direct sun for at least 6 hours daily.
- Proper planning requires mapping task lighting (steps, edges), ambient lighting (post caps), and accent lighting, then selecting weatherproof connectors and running cable in conduit to protect against UV and moisture damage.
- LED deck lighting ideas transform outdoor spaces into functional, inviting retreats that extend your home’s living area well into the evening without excessive heat output or fire risk.
Why LED Deck Lighting Is The Smart Choice For Homeowners
LED lights have become the go-to option for outdoor deck lighting, and for good reason. Unlike traditional incandescent or halogen fixtures, LEDs consume roughly 75% less energy while producing the same or brighter light output. That translates directly to lower electric bills and less frequent maintenance.
Durability matters on a deck. LEDs are solid-state lights with no filaments to break, they withstand vibration, moisture, and temperature swings that would kill older bulb types. A quality LED deck light lasts 25,000 to 50,000 hours (that’s 10 to 20 years of typical use), versus 1,000 to 2,000 hours for incandescent. You won’t be replacing bulbs every season.
Heat output is another advantage. LEDs generate minimal heat, making them safer around wood decking and reducing fire risk. They’re also available in various color temperatures, warm white (2700K) feels cozy, while cool white (5000K) reads as brighter and more functional. Color-tunable options let you adjust mood based on the occasion.
From a practical DIY angle, most LED deck lights run on low-voltage systems (12V or 24V) rather than standard household current (120V). Low-voltage circuits are safer to install yourself in many jurisdictions and don’t always require a licensed electrician or permit. That said, regulations vary by location, check your local code before wiring anything permanent.
Popular LED Deck Lighting Styles And Designs
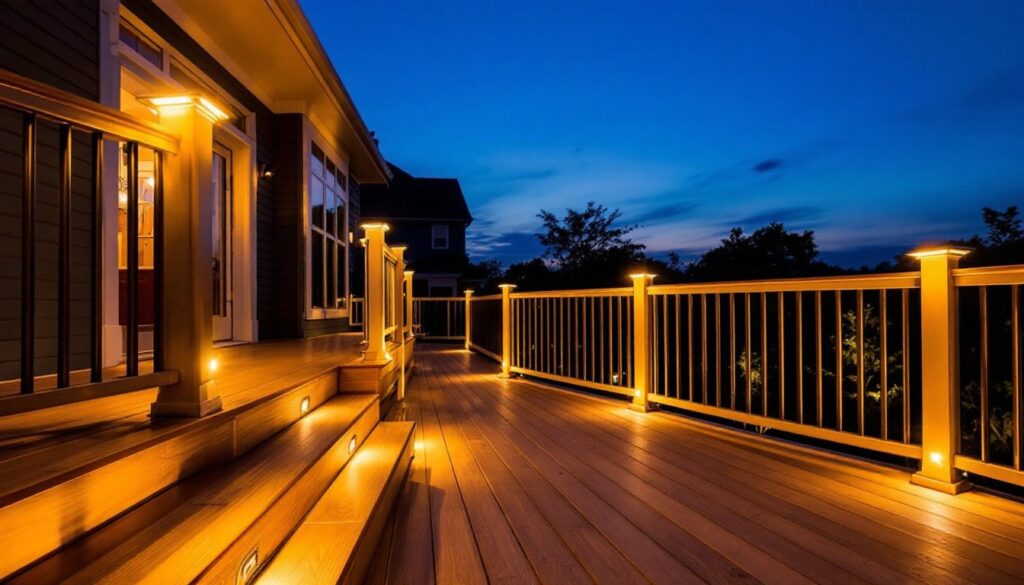
Recessed And Under-Rail Lighting
Recessed deck lights mount flush into the surface of your deck board or the underside of a railing, creating a sleek, minimal look. These fixtures are installed before decking is fastened down (or after, if you’re retrofitting, though that’s more labor-intensive). A typical 2-inch recessed LED fixture creates a downlight that illuminates the deck surface or a staircase below without drawing attention to the light source itself.
Under-rail lighting mounts on the inside face of your deck railing and casts light downward onto steps or the ground below. This setup is both functional and attractive, it adds safety by clearly marking step edges while creating a soft ambient glow. You can run multiple low-voltage LED strip lights or small capsule fixtures in a continuous line for even coverage.
The installation process depends on your deck’s construction. If you’re building new, mark light locations during framing and cut holes before installing decking. For retrofits, you’ll need to work from underneath the deck (if there’s crawl space) or carefully drill from the top and route wiring through the substructure. Recessed lighting transforms spaces with clean lines, and the same principle applies to decks, the fixture disappears: only the light remains.
Post Caps And Solar LED Options
Post cap lights are perhaps the easiest DIY option. These square or rounded fixtures slip over the top of your 4×4 or 6×6 deck posts and screw down. A single post cap with an integrated LED (usually 4-6 watts) casts a wide downward glow and instantly adds polish to your railing design. Many post caps come with integrated solar panels, which charge during the day and activate automatically at dusk. Installation is literally: unscrew, place, screw down. No wiring required.
Solar options have improved dramatically. Older solar deck lights dimmed as the night wore on or barely produced usable light. Today’s solar LED post caps and rail lights offer decent brightness if positioned in direct sun for at least 6 hours daily. They work best as accent lighting rather than primary illumination, and performance drops in cloudy climates or heavy shade.
If you want hardwired reliability and brighter output, consider low-voltage LED post cap lights connected to a transformer and dimmer switch. You’ll run weatherproof wire through or under your deck structure to a centralized power source. Outdoor lighting ideas transform backyards into functional, attractive spaces, deck posts are prime real estate for fixtures that do double duty as design elements and task lighting. Track lighting systems offer flexible solutions for directing light where you need it most.
Recent designs from home lighting experts demonstrate that modern LED deck lighting blends seamlessly into traditional and contemporary deck aesthetics. The key is choosing fixtures that match your deck material (wood, composite, or PVC) and railing style.
Installation Tips For DIY Success
Planning and Layout
Start by mapping out where light will actually be useful. Task lighting (steps, edges) keeps people safe. Ambient lighting (post caps, under-rail) creates atmosphere. Accent lighting highlights architectural features or landscaping. Sketch your deck from above and mark fixture locations before you buy anything. Measure twice, order once.
Materials and Tools
For a low-voltage hardwired system, you’ll need:
• A 12V or 24V LED transformer rated for your total wattage (add up all fixtures)
• Low-voltage cable (typically 10 or 12 gauge, depending on run length)
• Weatherproof junction boxes and connectors
• Individual LED fixtures (recessed, post caps, or strip lights)
• A timer or dimmer switch (optional but recommended)
Tools include a drill, wire strippers, a voltage tester, silicone caulk, and stainless steel fasteners (galvanized corrodes over time on treated lumber). For solar post caps, you need nothing beyond a screwdriver.
Wiring Fundamentals
Low-voltage systems are forgiving but still require attention. Your transformer steps down standard 120V household current to 12V or 24V. The transformer must be rated for the total wattage of all connected fixtures. If you’re running lights in parallel (all directly to the transformer), add up the watts. If running in series, subtract each fixture’s voltage drop as current travels down the line.
Run cable in conduit under the deck or within railing posts to protect it from UV, moisture, and physical damage. Use stainless steel or high-quality weatherproof connectors, corrosion is the enemy of reliability. Silicone caulk seals any opening where wire enters a fixture. Proper lighting design requires understanding both aesthetic and functional layers, and outdoor electrical work is no exception.
Safety and Code
Before connecting anything, confirm your local electrical code. Some jurisdictions require a licensed electrician for any deck work: others allow homeowners to handle low-voltage systems without a permit. Check with your city or county building department, a 10-minute call saves headaches later.
Wear safety glasses when drilling and installing fixtures. Use a voltage tester to confirm power is off before working on any wiring. If you’re working underneath the deck, wear a dust mask to avoid inhaling debris. Professional installation guidance ensures system longevity and peace of mind.
Testing and Adjustments
Once wired, test each light individually before permanently fastening fixtures. Confirm brightness meets your expectations, if not, upgrade the transformer or switch to higher-wattage bulbs. Adjust any dimmers or sensors to suit your preferences. Step back at night and look for dark spots or harsh shadows that need a fixture moved or angled.
Conclusion
LED deck lighting isn’t a luxury, it’s a practical upgrade that extends the usable life of your outdoor space. From recessed fixtures that disappear into the deck surface to solar post caps that require zero wiring, options exist for every skill level and budget. Do your assignments on local codes, plan your layout carefully, and don’t skip prep work or safety steps. When done right, your deck becomes a welcoming retreat morning, noon, or night.


