Table of Contents
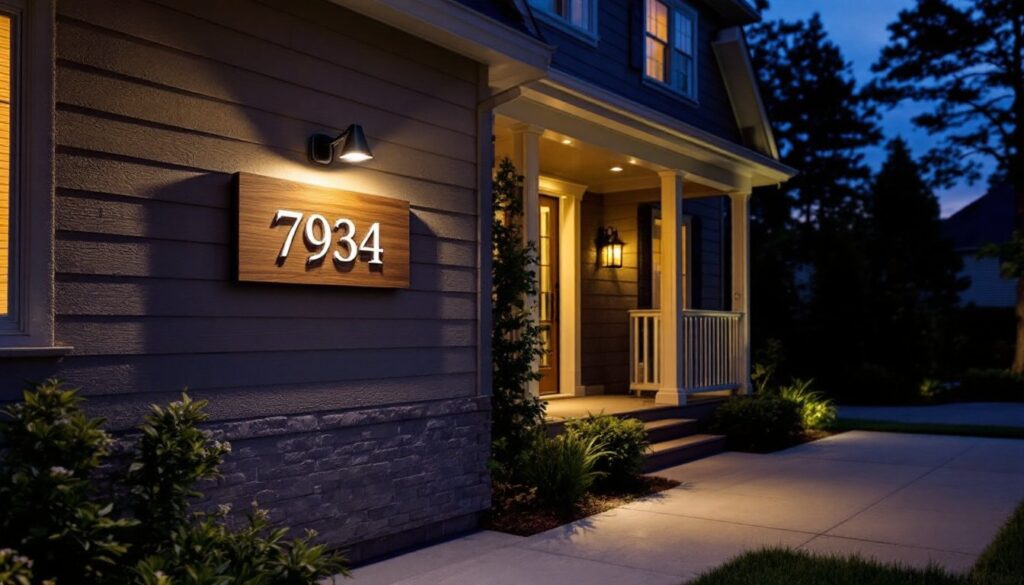
ToggleYour home’s address sign is often the first thing visitors notice after dark. Without proper lighting, it blends into the shadows, leaving guests searching and delivery drivers confused. Outdoor sign lighting isn’t just a functional necessity, it’s a relatively simple upgrade that boosts curb appeal and security in one shot. Whether you’re installing uplighting on an existing sign or building a backlit display from scratch, this guide walks you through the options, installation steps, and maintenance routines that’ll keep your sign glowing for years. Let’s get your home’s entrance shining.
Key Takeaways
- Outdoor sign lighting improves safety, security, and curb appeal while deterring package theft and helping emergency responders locate your home quickly.
- Choose between solar (zero wiring, $25–$150), low-voltage LED systems ($100–$250), or hardwired fixtures ($150–$500+) based on your sign’s location and desired brightness level.
- LED fixtures consume 75–80% less energy than traditional bulbs, last 25,000–50,000 hours, and deliver superior brightness—a 12W LED matches a 50W halogen’s output.
- Aim for 300–800 lumens depending on sign size, and select warm white (2700K–3000K) for residential curb appeal or cool white (5000K+) for maximum visibility in dark areas.
- Annual maintenance like wiping fixtures twice yearly and checking connections prevents 10–20% light loss from dust buildup and catches corrosion early.
- Smart controls like dusk-to-dawn sensors and motion detectors add security while reducing energy costs, typically paying for themselves within two years.
Why Outdoor Sign Lighting Matters For Your Home
A well-lit address sign serves multiple purposes beyond aesthetics. First, it improves safety and security, a brightly illuminated address makes it easier for emergency responders to locate your home quickly in a crisis. Second, it increases curb appeal and property value. Potential buyers or appraisers notice attention to detail, and a properly lit sign signals that you care for your home’s appearance. Third, a lit sign deters package theft and trespassing because it makes your entrance feel active and monitored after dark.
Most homeowners underestimate how much a dark sign detracts from an otherwise well-maintained property. You might have fresh landscaping and a clean driveway, but if visitors can’t read your address, the overall impression suffers. Outdoor sign lighting levels the playing field, it’s an affordable project (typically $50–$300 depending on method and fixture quality) that yields outsized visual impact. Whether you choose solar, low-voltage, or hardwired fixtures, the return on curb appeal is immediate.
Types Of Outdoor Sign Lighting Options
Your lighting choice depends on your sign’s placement, power availability, and desired brightness level.
Solar lights are the no-fuss entry point. They require zero wiring, just mount a solar panel above or beside your sign and let the sun charge a rechargeable battery. Models range from simple clip-on spotlights (around $25–$50) to integrated solar sign lights ($80–$150). The downside is that solar output weakens in cloudy regions and dims as batteries age. On clear nights, a good solar light provides adequate ambient lighting but won’t produce true spotlit brilliance.
Low-voltage LED systems (typically 12V) offer a middle ground. A transformer steps down standard 120V household current to 12V, and low-gauge wire runs to your fixture. Installation requires drilling or routing wire through conduit, but there’s no deep trenching or running heavy-gauge cables. Many kits cost $100–$250 and handle multiple fixtures on one circuit. Brightness is adjustable, and you can add dimming controls for nighttime moods.
Hardwired (line voltage) fixtures connect directly to 120V household power. They deliver maximum brightness and reliability but demand the most installation work. You’ll need to run outdoor-rated wire (typically UF-B cable), possibly route it through conduit, and install a GFCI-protected outlet or switch nearby. This option is ideal if your sign is near an existing exterior outlet or if you’re planning a dedicated circuit. Costs range from $150–$500+ depending on wiring distance and fixture quality.
LED Vs. Traditional Lighting For Signs
LED fixtures dominate today’s outdoor sign lighting market, and for good reason. LEDs consume 75–80% less energy than incandescent or halogen bulbs, last 25,000–50,000 hours (versus 1,000–2,000 for incandescent), and produce minimal heat. A 12W LED spotlight delivers the brightness of a traditional 50W halogen while running cooler and drawing far less power.
Traditional incandescent or halogen spotlights are largely obsolete for sign lighting because they’re inefficient, fragile, and require frequent bulb replacement. If an older fixture uses them, swapping to an LED retrofit bulb is a quick upgrade path. Halogen also creates unwanted heat on summer nights and can fade materials on nearby surfaces.
LED color consistency is another win, most outdoor sign lights are offered in warm white (2700K–3000K) or cool white (4000K–5000K). Warm white feels inviting and residential: cool white is brighter and more clinical. For curb appeal, warm white typically complements home exteriors better. Landscape Lighting: Transform Your backyard into a stunning nighttime environment uses similar principles for overall property aesthetics.
Choosing The Right Brightness And Color Temperature
Brightness is measured in lumens. For sign lighting, aim for 300–800 lumens depending on sign size and surroundings. A small address plaque on a well-lit porch might only need 300 lumens: a large monument sign set back from the street could need 800+ lumens to be readable from the curb. Too little light leaves the sign dim and hard to read: too much washes it out and looks harsh.
Color temperature affects mood and readability. Warm white (2700K–3000K) is easier on the eye during nighttime and feels cozy, ideal for residential properties. Neutral white (4000K) bridges the gap and works well for traditional or modern homes. Cool white (5000K+) is brightest and most clinical: use it only if your sign is in a very dark area or you want maximum legibility at distance.
Consider the sign material and surroundings, too. Dark signs need brighter uplighting to pop: light or reflective signs require less. Wood-look signs harmonize with warm white: aluminum or steel signs can handle neutral or cool white. Test if possible, many lighting retailers offer sample fixtures or color temperature comparisons online. Outdoor Lighting Ideas: Transform your space explores how color temperature shapes the entire outdoor environment, a principle that extends to sign lighting as well.
Installation Tips For DIY Success
Planning and prep prevent headaches. Before buying anything, measure your sign and note its material (wood, metal, stone, etc.). Identify the best light position, usually 45 degrees above and slightly in front of the sign, angled downward for shadow-free illumination. Check for nearby power sources: running wire 50+ feet adds cost and complexity, so closer is better.
For solar lights: Mount the solar panel in direct sunlight, south-facing is ideal in North America. Use stainless steel or corrosion-resistant hardware: salt air and moisture corrode cheap fasteners quickly. Ensure the sensor and panel face upward and aren’t shaded by trees or structures. Lighting Secrets: Transform your understanding of how light placement shapes visual impact.
For low-voltage systems: Use a weatherproof transformer (IP65-rated minimum) installed in a dry location, ideally indoors or in a covered outdoor enclosure. Run outdoor-rated wire (12 AWG for distances under 50 feet: 10 AWG for longer runs) through conduit if it’s exposed to foot traffic or weather. Splice connections must be waterproof, crimp connectors rated for outdoor use, not twist-on connectors. Test all connections with a multimeter before burying or covering wire.
For hardwired fixtures: You’ll likely need a licensed electrician unless you’re already GFCI-proficient. Rough-in wiring before installing the fixture. Use UF-B (underground feeder) cable if running wire outdoors: it’s rated for ground burial and direct exposure. Install a GFCI outlet or breaker on a dedicated 20-amp circuit (check local codes, they vary). Conduit is required in many jurisdictions for exposed wire runs. After the electrician signs off, mounting the fixture is a homeowner task.
Safety first: Wear eye protection when drilling into stone or brick. Use a stud finder to locate solid mounting points: never hang heavy fixtures on drywall anchors alone. If wiring, wear work gloves to avoid copper cuts and turn off power at the breaker before touching any line-voltage wires. Outdoor Track Lighting: Brightening spaces with mounted fixtures follows similar electrical safety rules, never skip the GFCI.
Common mistakes: Undersizing wire gauge (causes voltage drop and dim lights), forgetting conduit or UV-rated wire covers (UV degrades unprotected wire in 2–3 years), and mounting lights facing upward instead of downward (causes glare and poor sign illumination). Take time to route wire neatly, it’s invisible once done but prevents a tangled mess later.
Maintenance And Energy Efficiency Best Practices
LEDs need virtually no maintenance, no bulb changes, no frequent cleanings. That said, dust and grime build up on fixtures and lenses, reducing light output by 10–20% yearly. Wipe down fixtures twice a year with a soft cloth and mild soap. For stubborn debris, use a soft brush: avoid abrasive pads that scratch protective coatings.
Check connections annually, especially in coastal or high-humidity areas. Corrosion creeps up on outdoor electrical connections, and loose terminals cause flickering or complete failure. Tighten terminal screws and inspect for white or green oxidation, if found, clean with a dry brush or replace corroded terminals.
For solar lights, the rechargeable battery degrades over 3–5 years. Most solar fixtures use replaceable NiMH batteries (around $10–$20 each). When a solar light dims even though clear skies, a battery replacement typically restores performance. Clean the solar panel quarterly to maximize charging.
Energy savings add up. A single 12W LED light running 12 hours nightly uses about 52 kWh annually. At an average rate of $0.13 per kWh, that’s roughly $7 per year in electricity. A traditional 50W fixture would cost $28 annually, over $20 in savings per fixture. According to HomeAdvisor, outdoor lighting projects are among the highest ROI home upgrades, and energy efficiency multiplies that return when you choose LEDs.
Smart controls (timers, motion sensors, dimmers) boost efficiency further. A dusk-to-dawn sensor ensures lights run only when needed, no accidental daytime operation. Motion sensors can brighten the sign when someone approaches, adding both security and energy savings. These upgrades cost $30–$80 but pay for themselves in just a couple of years.
Conclusion
Outdoor sign lighting transforms a forgotten detail into a polished, secure asset. Whether you choose solar simplicity, low-voltage flexibility, or hardwired reliability, you’ll see immediate curb appeal gains and practical security benefits. Pick your method based on power availability and desired brightness, follow installation best practices, and maintain fixtures yearly. A well-lit address sign isn’t just visible, it’s an invitation to your home.


