Table of Contents
ToggleThe kitchen sink is where the real work happens, scrubbing dishes, prepping ingredients, and tackling the endless pile of cleanup. Yet many homeowners neglect lighting above kitchen sink areas, leaving themselves squinting under dim overhead fixtures or shadowy corners. Proper above kitchen sink lighting transforms this utilitarian space into a functional, well-lit zone where you can actually see what you’re doing. Whether you’re dealing with a dingy workspace or planning a kitchen refresh, understanding your lighting options, from pendant lights to recessed fixtures, makes the difference between a frustrating chore and a genuinely pleasant task.
Key Takeaways
- Above kitchen sink lighting transforms a utilitarian workspace into a functional, well-lit zone that improves both safety and visibility for washing dishes, prepping ingredients, and detailed kitchen tasks.
- Pendant lights, recessed fixtures, and flush mounts are the three main above-sink lighting options—pendant lights offer style and flexibility, while recessed and flush-mount fixtures suit lower ceilings and modern aesthetics.
- For optimal above-sink lighting, aim for 800 to 1,200 lumens total brightness with a warm 3000K color temperature, which provides clear visibility without harsh, sterile light.
- Installation safety is critical: ensure fixtures are positioned 12 inches or more above the countertop, centered over the sink bowl, and properly wired to dedicated outlets with power turned off during work.
- Dimmable LED bulbs in 3000K color temperature offer flexibility for different times of day, reducing eye strain during evening dishwashing while maintaining full brightness for meal prep.
- Coordinate above-sink lighting finishes with existing kitchen hardware and design style—matte black pendants complement black faucets, while brass or warm-toned fixtures match brass hardware for a cohesive look.
Why Kitchen Sink Lighting Matters
The kitchen sink accounts for a disproportionate amount of time spent in the kitchen. You’re there to rinse vegetables, hand-wash delicate items, fill pots, and perform detailed prep work. Without adequate lighting, you’ll strain your eyes, miss spots during cleaning, and feel the fatigue of working in gloom.
Proper sink lighting also affects safety. Wet surfaces, sharp knives, and hot water demand visibility. Poor lighting increases the risk of accidents and makes simple tasks feel tedious. Beyond practicality, well-lit sink areas feel more inviting, they’re a selling point in home showings and a genuine quality-of-life upgrade.
Most kitchens rely on a single overhead fixture, which casts shadows directly where you need light most. That’s why task lighting, targeted illumination, over or near the sink is essential. It supplements general kitchen lighting and creates a workspace that feels intentional rather than afterthought.
Types of Above-Sink Lighting Fixtures
Pendant Lights
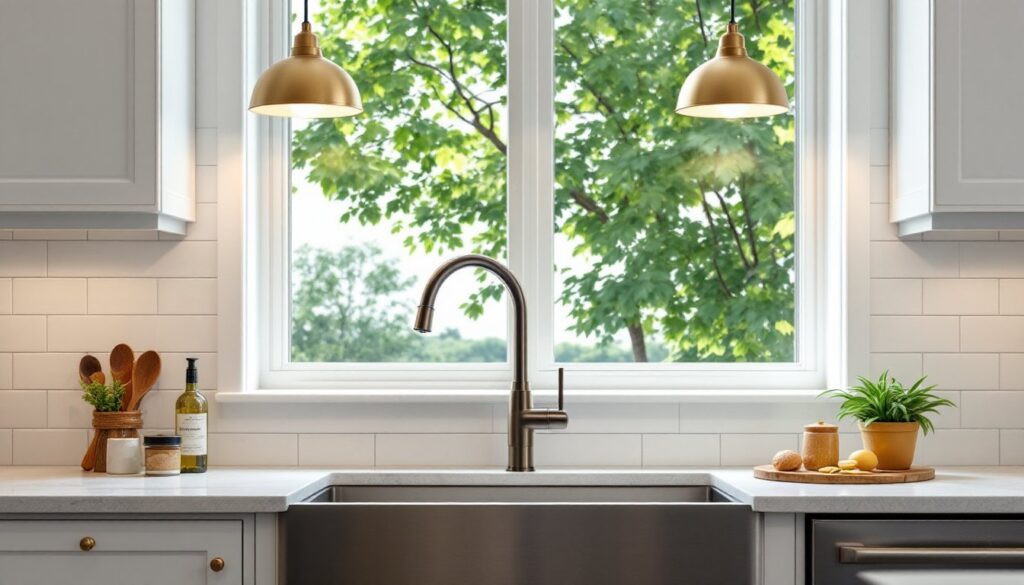
Pendant lights hang from the ceiling on a cord, chain, or rod, positioning a shade and bulb directly above the sink. They’re popular because they’re decorative, focused, and easy to install. A standard pendant hangs 12 to 20 inches below the ceiling (adjustable via cord or chain length) and typically sits 3 to 5 feet above the countertop, creating a direct, concentrated light source.
Pendant Lighting: Transform Your is a practical option for most kitchen layouts. You can install one centered above the sink, or pair two smaller pendants flanking a wide sink. Choose frosted or translucent shades to diffuse light evenly and reduce glare on wet surfaces. Avoid fully opaque shades that trap light: you want illumination on the sink, not just the shade itself.
Consider bulb type: LED A-19 or BR-30 bulbs are efficient and long-lasting. For pendant fixtures, aim for 3000K color temperature (warm white) to keep the space inviting while maintaining visibility. Most pendant fixtures require a standard light socket, making bulb replacement straightforward.
Recessed Lighting and Flush Mounts
Recessed Lighting: Transform Your are built into the ceiling and sit flush with the drywall, offering a clean, minimalist look. A standard 4-inch recessed can light (can diameter) works well over sinks. These require ceiling access and, typically, a new rough-in housing installed before drywall, a structural consideration.
Flush-mount or semi-flush fixtures sit closer to the ceiling than pendants, making them ideal for lower ceilings (under 8 feet) where pendants might feel cramped. They’re less decorative than pendants but functional and versatile.
Both recessed and flush-mount options benefit from trim ring selection. A baffle trim (a recessed cylinder inside the can) reduces glare and shadows, essential when the fixture sits directly above work surfaces. Without it, you’re left with harsh downward light and a dark ring visible from below.
Installation Tips and Best Practices
Before you drill or cut, measure your ceiling height, sink width, and existing electrical boxes. Most kitchen ceilings are 8 feet (96 inches) standard: if yours is 7.5 feet or lower, pendants will feel tight, go with recessed lights or low-profile flush mounts instead.
For pendant installation, you’ll need an existing ceiling outlet or the ability to run new electrical wire. If no outlet is present, you’ll likely need a licensed electrician, don’t jury-rig a ceiling fan box for a pendant light fixture. Once you have power, install a pendant mounting bracket (usually a simple 4-inch round plate with threads). Thread the cord through, secure the fixture, and connect the wires (black to black, white to white, ground to ground or bare). Seal the junction box with a cover plate.
Keep these best practices in mind:
- Height matters: Bottom of pendant shade should be at least 12 inches above the countertop to avoid bumping your head or blocking your view downward.
- Position: Center the fixture(s) over the sink bowl, not off to one side.
- Spacing: If using two pendants, space them 24 to 36 inches apart.
- Wiring access: Ensure wires pass through existing joists safely, no squishing or pinching.
- Support: Verify your ceiling can handle the fixture’s weight: most kitchens use 1/2-inch drywall over wooden joists, which is plenty for lightweight pendants (under 5 pounds). Heavier fixtures may need blocking or bracing between joists.
For recessed lights, you need ceiling cavity (space between the ceiling and whatever lies above it, usually attic or floor joists). Mark your holes, cut them to size (typically 4 to 6 inches), and insert the housing. Secure the housing to the joists, then wire to your ceiling outlet. This is where a second pair of hands or a professional electrician makes the job far easier, you’re working overhead in tight spaces.
Always turn off power at the breaker before touching any wires. Use a voltage tester (a pen-shaped device under $10) to confirm the power is off. If you’re not confident with wiring, hire a licensed electrician: the cost is small compared to a fire hazard.
Choosing the Right Brightness and Color Temperature
Brightness is measured in lumens, not watts. An older 60-watt incandescent bulb produced about 800 lumens: modern LED equivalents use 8-10 watts for the same output. For task lighting over a sink, aim for 800 to 1,200 lumens total. If you’re installing two fixtures, you can split this, 600 lumens each.
Color temperature, measured in Kelvins (K), affects how the light feels. 2700K is warm and cozy (like old incandescent bulbs). 3000K is neutral warm, ideal for kitchens where you want visibility without cold, sterile light. 4000K and above reads as cool or daylight-tone, which some prefer for task work but can feel harsh in a home setting.
For kitchen sink lighting, 3000K LED bulbs are the sweet spot: they provide clear visibility without the cold-office feel of 4000K, and they warm the skin tone of anyone working at the sink (a psychological comfort factor). Dimmable LED bulbs let you adjust brightness for different times of day, cooking prep might need full brightness, while evening dish-washing can be slightly dimmed.
Check your fixture’s maximum wattage rating printed on the socket or assembly. LED bulbs run cool and don’t generate the heat of old incandescents, so you can often use a higher lumen count safely, but respect the fixture’s electrical limit.
Design Ideas to Complement Your Kitchen
Your above-sink lighting choice sets the tone for the entire window area. If you have a window above the sink, pendant lights frame it beautifully and add visual interest at night when the window becomes a dark backdrop.
Pendant styles to consider:
- Dome or bell-shaped shades: Clean, classic lines that work with farmhouse, traditional, or mid-century aesthetics.
- Industrial metal shades: Black or brushed steel fixtures pair well with modern, industrial, and eclectic kitchens.
- Glass or clear globe pendants: Showcase the bulb and create a minimalist, Scandinavian vibe.
- Woven or rattan shades: Add warmth and texture, suits coastal or bohemian kitchens.
Kitchen design resources offer inspiration galleries showing pendant light applications across different kitchen styles. Pair your pendant with consistent finishes elsewhere in the kitchen, if your faucet is matte black, black pendants create cohesion. If hardware is brushed brass, brass or warm-toned pendant finishes tie the zone together.
For a curated selection of kitchen-appropriate pendants, 10 Easy Pieces: Pendant Lights for the Kitchen showcases tested fixtures with real-world install insights. You can also supplement sink lighting with Under Cabinet Lighting: Transform Your Kitchen with Style and Efficiency to create layered, balanced illumination throughout the workspace.
Consider the ceiling finish as well. Pendant cords and chains are more visible against white ceilings: darker ceilings can hide them. If you’re open to ceiling work, a white or light gray ceiling makes the space feel larger and reflect light downward more effectively.
<h2 id="” data-id=””>Final Thoughts
Above kitchen sink lighting isn’t a luxury, it’s a functional necessity that pays dividends every time you use the sink. Whether you choose pendants for style, recessed lights for sleekness, or a combination of both, the key is positioning light directly where you work, choosing a warm but visible color temperature, and securing fixtures properly to safe electrical outlets. Start with accurate measurements, don’t rush the wiring, and you’ll have a bright, welcoming workspace that makes daily kitchen tasks genuinely pleasant.


