Table of Contents
ToggleRecessed can lighting has become the backbone of modern kitchen design, and for good reason. It’s clean, adjustable, and doesn’t eat up overhead space the way pendant fixtures or chandeliers do. But choosing the right cans, figuring out how many you actually need, and getting them installed correctly trips up plenty of DIYers. This guide walks you through everything: what to look for when shopping, how to layout your lights for even coverage, the real steps to install them safely, and the pitfalls that derail most first-timers. Whether you’re refreshing an older kitchen or starting from scratch, you’ll have the confidence to nail this project.
Key Takeaways
- Kitchen can lighting provides clean, adjustable illumination that doesn’t clutter your ceiling space, making it the modern standard for kitchen design.
- Choose 5-inch or 6-inch diameter cans with dimmable LED bulbs rated for wet locations (IC-marked) and color temperatures between 3000K–4000K based on your zone’s function.
- Space cans 1.5 times their diameter apart for ambient light (7–8 feet for 5-inch cans), but reduce spacing to 3–4 feet over counters and islands for proper task lighting coverage.
- Always use a stud finder to locate joists and hidden wiring, shut off power at the breaker, test circuits with a voltage tester, and consult a licensed electrician for wiring to ensure code compliance and safety.
- Avoid common installation errors including using retrofit (remodel) cans instead of new construction models, overheating non-IC-rated fixtures in insulated cavities, and mixing old incandescent dimmers with LED fixtures.
Understanding Kitchen Can Lighting Basics
What Are Recessed Can Lights and Why They’re Ideal for Kitchens
Recessed can lights, often called downlights or cans, are light fixtures that sit flush in your ceiling. The “can” is the housing that mounts between joists (the wooden beams that run perpendicular to your ceiling), and a trim ring or bezel sits flush with the drywall. They’re ideal for kitchens because they don’t visually clutter the space, they direct light downward where you need it most, and they’re dimmable when wired with the right switches and bulbs.
The main advantage over other fixtures is versatility. A single row of cans over a counter provides task lighting. Multiple rows across the ceiling create ambient light. And unlike a chandelier or pendant that dominates a room visually, cans let your cabinetry, countertops, and backsplash be the stars. They also run cooler than older surface-mounted fixtures because the housing disperses heat into the ceiling cavity.
There are two basic housing types: new construction (for open cavities where you haven’t installed drywall yet) and retrofit or remodel (for existing ceilings). For most kitchen projects, you’ll use remodel cans because you’re working with a finished ceiling. These have spring-loaded brackets that grip the drywall from below, making installation faster than new construction types.
Before you start buying fixtures, you should also know that kitchens are wet/humid spaces. Building codes require wet-location rated fixtures (marked “IC” for “insulated ceiling”) in kitchens, especially near sinks and ranges. Check your local building code, it varies by jurisdiction. If you’re not sure, ask your local building department or an electrician.
Choosing the Right Can Lights for Your Kitchen
Size, Wattage, and Color Temperature Considerations
Can lights come in standard sizes: 4-inch, 5-inch, and 6-inch diameter housings. For kitchens, 5-inch or 6-inch are most common. Bigger cans allow more light to spread and accept higher-wattage bulbs. A 4-inch can works in tight spaces (like between joists in an older home) but won’t throw as much light, so you’ll need more of them.
Wattage depends on the bulb type. Older cans used incandescent or halogen bulbs consuming 50–75 watts. Modern LED cans pull 8–15 watts for equivalent brightness and run much cooler. If you’re retrofitting into existing wiring, you can usually switch to LEDs without changes. Always check the fixture’s maximum wattage rating to avoid overheating.
Color temperature is measured in Kelvin (K). For kitchens, aim for 3000K to 4000K. At 3000K (warm white), the light feels cozy and flatters skin tones, good for dining areas. At 4000K (neutral white), colors appear truer and details pop, ideal for prep zones. Many kitchens use 4000K over counters and 3000K over dining tables. LED bulbs let you pick the temperature easily: older incandescent or halogen cans were locked into whatever the bulb was.
Dimmability matters too. If you want to adjust brightness, buy dimmable LED cans and pair them with a dimmer switch rated for LED (not old incandescent dimmers, they can cause flickering). Specify dimmable when shopping: not all LEDs dim smoothly on standard dimmers.
Other features to consider: trim finish (matte white, chrome, or painted to match your ceiling), baffle inserts (for tighter, more focused beams), and trim rings (recessed, open, or with a decorative flange). For a kitchen, matte white or painted trim blends invisibly into a typical ceiling.
Layout and Spacing Guidelines for Optimal Coverage
Spacing is where most DIYers stumble. Place cans too far apart and you get hot spots and shadows. Too close and you waste fixtures and money.
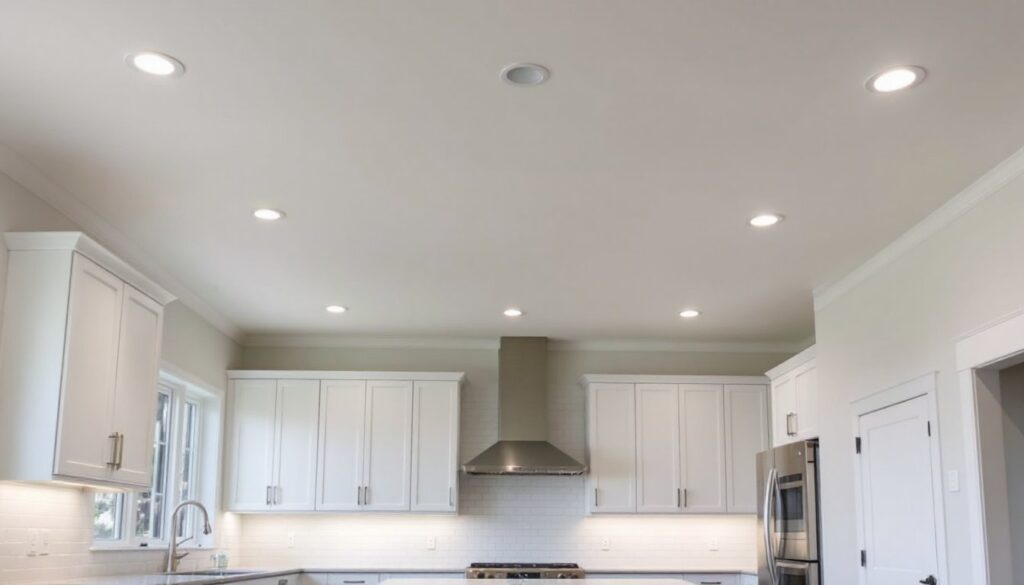
The rule of thumb: Space cans 1.5 times the can’s diameter apart in one direction for general ambient light. For a 5-inch can, that’s roughly 7–8 feet apart. For 6-inch, aim for 9–10 feet. These distances work for a standard 8-foot or 9-foot ceiling. If your ceiling is higher (10 feet or more), you can space them slightly farther apart because light spreads more, but don’t exceed 12 feet between cans in a kitchen, you want even illumination.
Task lighting over work zones (counters, island) should be closer and denser. A single row of cans running parallel to a counter should sit about 24–30 inches out from the counter edge and spaced 3–4 feet apart along the run. This puts bright light exactly where you’re prepping food.
For an island or peninsula, run two parallel rows (one on each long side) at the same 24–30 inch offset. If your island is narrow (under 3 feet), a single centered row works.
Perimeter cans around the kitchen’s edges add ambient light and balance the overhead grid. Aim for cans about 24 inches from walls and spaced 4–5 feet apart.
Before drilling any holes, sketch your layout on graph paper or use a lighting layout tool to visualize spacing. Hold a bright flashlight to your ceiling to see where shadows fall. Adjust on paper first, it’s free to erase: it’s expensive to patch drywall and move cans.
Installation Steps for DIY Can Light Setup
Materials & Tools:
- Remodel can light housings (5 or 6-inch, IC-rated, dimmable LED or compatible with your bulbs)
- Drywall hole saw (same diameter as the can’s trim ring, typically 5.25 or 6.25 inches)
- Stud finder (to avoid joists and hidden plumbing/electrical)
- Voltage tester (non-negotiable for safety)
- Wire nuts, electrical tape, and 14 or 12-gauge wire (size depends on breaker: consult a licensed electrician if unsure)
- Drywall patch and mud (for mistakes)
- Personal protective equipment: safety glasses, dust mask, work gloves
- Drill with a drywall bit (pre-hole before using the hole saw)
Installation Steps:
-
Plan and mark holes. Use your sketch. Locate joists and hidden wiring with a stud finder, many also detect live electrical wires. Mark each hole center with a pencil. Double-check spacing.
-
Shut off power. Turn off the breaker that controls the kitchen lighting circuit. Use a voltage tester on the existing ceiling fixtures to confirm power is off. This is non-negotiable.
-
Drill pilot holes. Use a ⅛-inch bit to drill small starter holes at each mark. This prevents the hole saw from wandering.
-
Cut drywall. Attach the appropriate hole saw to your drill. Cut slowly and steadily, don’t force it. Drywall dust will fall, so have a drop cloth below and wear a mask.
-
Install the housing. Remove the can from its bracket assembly. Feed electrical wire through the hole into the ceiling cavity. Insert the bracket into the ceiling opening. The spring-loaded brackets grip the drywall, you’ll hear a click. Secure the can to the bracket.
-
Wire the fixture. This is where you’ll likely want a licensed electrician’s help unless you’re comfortable with electrical work. Connect the can’s wires to your kitchen circuit using wire nuts. Use black-to-black (hot), white-to-white (neutral), and green or bare copper to ground. Wrap connections with electrical tape.
-
Install trim and bulbs. Once wiring is complete and the power is restored, snap the trim ring into place. Install dimmable LED bulbs rated for your can’s wattage.
-
Test and adjust. Turn on the power and test. Adjust dimmer switches to confirm smooth operation. If bulbs flicker, you may need an LED-compatible dimmer.
Pro tip: If you’re adding cans to an existing circuit, don’t overload it. A standard 15-amp kitchen circuit can safely handle about 6–8 LED cans (accounting for other loads). If you need more, run a new circuit, this definitely requires a licensed electrician and likely a permit.
Common Mistakes to Avoid When Installing Kitchen Can Lights
Skipping the stud finder. Drilling into a joist ruins a can’s mounting and wastes your hole. Worse, you might hit plumbing or electrical hidden in the cavity. Spend $20 on a good stud finder, it pays for itself in one avoided mistake.
Wrong housing type. New construction housings are useless in a finished ceiling. Retrofit cans are what you need. If you’re confused, ask the supplier: “Is this remodel-rated for 1.5-inch drywall?” It should say so on the box.
Overheating fixtures. Recessed cans sit in an insulated ceiling cavity where heat builds up. Use only IC-rated (insulation-contact) housings. Never use non-IC cans in insulated attics, they’ll overheat, damage insulation, and create a fire risk. It’s printed right on the fixture: check it.
Mixing dimmer types. Old incandescent dimmers won’t work smoothly with LED cans and may cause buzzing or flickering. Buy LED-compatible dimmers from the start. They’re barely more expensive and save frustration.
Overcrowding wires. You’ll have multiple cans feeding into your circuit. Keep wire connections neat and don’t overstuff the junction box. If you’re unsure about wire gauge or circuit capacity, call a licensed electrician. Kitchen electrical code is strict for safety reasons.
Ignoring moisture ratings. Kitchens require wet-location rated fixtures (marked “IC”) due to humidity from cooking, dishwashing, and steam. Standard cans corrode or fail faster. It’s a small upcharge and worth every penny.
Forgetting about future changes. Before you seal up the ceiling, take a photo of your layout and joist positions. Mark it on your plan. When you want to relocate a can in three years or add one, you’ll know where things are without poking new holes.


