Table of Contents
ToggleUnder cabinet lighting isn’t just decorative, it’s a workhorse that makes your kitchen safer and more functional. Whether you’re prepping dinner or looking for the matching container in the back of the fridge, proper task lighting cuts down on shadows and eyestrain. GE under cabinet lighting options deliver reliable illumination without the fuss of complex wiring or professional installation, making them an ideal choice for DIYers tackling their first serious kitchen upgrade. This guide walks you through why under cabinet lighting matters, what GE options exist, and how to install and design your setup for maximum impact.
Key Takeaways
- GE under cabinet lighting eliminates shadows on work surfaces and reduces eye strain during meal prep, making task lighting a practical kitchen safety and functionality upgrade.
- LED technology dominates GE under cabinet lighting options due to 75% lower energy consumption, 25,000+ hour lifespan, cool operation, and both warm and cool color temperature choices for any kitchen style.
- GE linkable under cabinet lighting systems offer flexible modular design with quick connectors, allowing DIYers to add or reconfigure strips as kitchen layouts evolve without complex wiring.
- Proper placement 3–6 inches from the cabinet front edge with 400–600 lumens per linear foot of countertop delivers shadow-free illumination without glare or harsh lighting.
- A typical kitchen upgrade costs $240–$2,000 in materials with an impressive return on investment through reduced electricity costs, improved safety, and increased home resale appeal.
- Plug-in LED strip models suit most DIY projects and require no electrical wiring, while hardwired installations demand professional help and local permits for code compliance.
Why Under Cabinet Lighting Matters For Your Kitchen
Under cabinet lighting addresses a fundamental kitchen design problem: your head casts a shadow directly onto your work surface. When you’re chopping vegetables or reading a recipe, overhead lights don’t cut it. Task lighting mounted under cabinets eliminates this shadow zone and creates a more inviting cooking environment.
Beyond functionality, under cabinet lighting also enhances safety. Better visibility means fewer cuts, spills, and missteps. It also reduces the strain on your eyes during meal prep, something that matters more than you’d think during long cooking sessions.
From a design perspective, under cabinet lights add depth and dimension to your kitchen. They highlight your countertop materials, create visual interest, and make the space feel intentional. Many homeowners also appreciate the ambiance these lights bring to the kitchen during evening hours, whether you’re entertaining or just winding down for the night.
GE under cabinet LED lighting is particularly popular because it strikes the balance between reliable performance and practical cost. GE linkable under cabinet lighting systems also allow for flexible configuration, so you can add lights as your kitchen layout evolves.
GE Under Cabinet Lighting Options: Find The Right Fit
GE offers several under cabinet lighting configurations, each suited to different kitchen sizes, budgets, and installation preferences. Understanding the differences helps you pick the right match for your space.
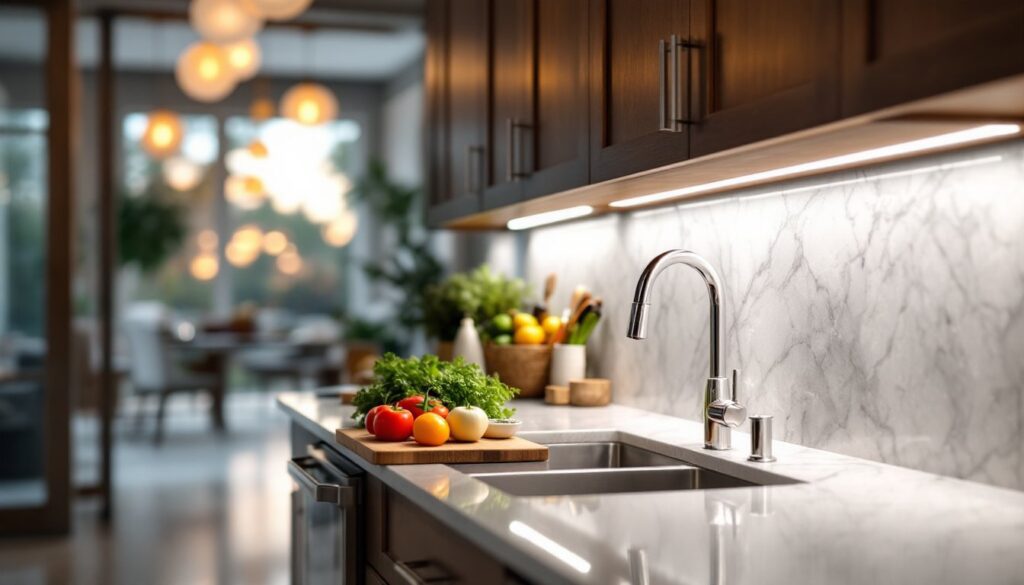
Linear LED strips are the most versatile option. They mount flush under cabinets and come in various lengths (typically 12 to 48 inches). GE linkable under cabinet lighting systems allow you to connect multiple strips with quick connectors, eliminating gaps and simplifying installation. These strips are slim, discreet, and deliver even light distribution across your entire countertop.
Puck lights (individual round fixtures) offer a modular approach. You space them along the underside of your cabinets, typically 12 to 18 inches apart. They’re easier to replace individually if one fails, but they cast more distinct pools of light, which some prefer for accent lighting and others find less ideal for task work.
Bar lights are elongated fixtures that sit at the front edge of cabinets, casting light downward and forward. They’re more visible as design elements, so consider whether your cabinetry style complements their profile.
Most GE under cabinet models include either hardwired or plug-in options. Hardwired installations are cleaner but require running electrical wire through cabinet frames, a more involved DIY project. Plug-in versions, with a cord running to a nearby outlet, involve no wiring but show a cord that some homeowners want to hide behind appliances or decorative trim.
LED vs. Fluorescent vs. Halogen
LED dominates modern under cabinet lighting for good reason. LEDs consume 75% less energy than incandescent bulbs and last 25,000+ hours. They stay cool to the touch, so they’re safe near wood cabinets, and they emit minimal heat, a real advantage in warm kitchens. GE under cabinet LED lighting options include warm white (2700K–3000K, cozy and inviting) and cool white (4000K–5000K, ideal for task work). Color temperature matters: cooler lights are sharper for detail work, while warmer lights feel more residential and flattering.
Fluorescent lights were the under cabinet standard before LED took over. They’re still efficient and affordable, but they take a moment to reach full brightness, generate a slight hum in some cases, and contain small amounts of mercury (requiring careful disposal). Most new installations skip fluorescent in favor of LED.
Halogen bulbs produce bright, warm light quickly but run hot and consume more energy. They’re rarely recommended for under cabinet work anymore, especially since LED technology has matured so much. GE’s shift toward LED and away from halogen reflects industry-wide recognition that LEDs outperform older technologies in every practical metric except upfront cost, and even that gap is closing.
Installation Guide: Getting Your GE Lights Up and Running
Before you start, gather your materials and tools. You’ll need a drill with a 1/8-inch bit (or 3/32-inch, depending on your fixture’s mounting holes), a level, measuring tape, painter’s tape, and depending on your model, wire strippers and a voltage tester if running hardwired circuits. Wear safety glasses when drilling into cabinet bottoms, wood chips fly upward.
Measure and mark. Use a pencil and measuring tape to mark fixture positions on the underside of your cabinets. Most lighting strips sit 3 to 6 inches from the front edge of the cabinet, creating a clean line of light that illuminates the countertop without shining directly at eye level when you stand in front of the counter. Measure the cabinet width, find the center, and work outward to ensure symmetry. Use a level to verify your marks, even a slight tilt creates an uneven visual line.
Prep the mounting surface. Wipe the cabinet undersides with a dry cloth to remove dust and grease. Some GE fixtures use adhesive strips (peel-and-stick mounting), while others require small bracket screws. If using brackets, pre-drill holes at your marked locations to avoid wood splitting. Cabinet bottoms are often veneered or finished plywood, so a 1/8-inch pilot hole prevents tear-out and makes screw insertion easier.
Mount the fixtures. If using adhesive strips, press firmly for 30 seconds to bond. If using screws, install small stainless steel or brass screws (typically 1/2 to 3/4 inch), avoid overtightening, which splits the wood. For GE linkable under cabinet lighting, connect adjoining strips with the quick connectors (usually a small plug-in assembly) before mounting, then secure the entire run as one unit.
Handle electrical connections. For plug-in models, route the cord along the back of your cabinet, behind an appliance, or down the side to a nearby outlet. A short cord tucked behind a refrigerator or microwave is cleaner than running it across visible countertop space.
For hardwired installations, this step involves cutting power at your circuit breaker, running 14-gauge Romex cable (or conduit, depending on your local code) through cabinet frames, and connecting to a dedicated or existing circuit. This work often requires a permit and inspection, so check your local building department’s requirements before starting. Many homeowners hire a licensed electrician for hardwired work, there’s no shame in that choice, and it ensures code compliance and safety.
Test before finalizing. Turn the power on and verify all lights illuminate evenly. Check for flickering, which indicates a loose connection or insufficient power to the fixture. If everything looks good, any adhesive strips have set (allow 24 hours if specified by the manufacturer), and your brackets are snug, you’re done.
Design Tips: Placement and Brightness For Maximum Impact
Where you place lights matters as much as which ones you buy. The goal is consistent, shadow-free illumination without harsh glare.
Placement strategy. Install lights 3 to 6 inches from the front edge of your cabinet, close enough to illuminate countertops without shining into your eyes. If you have upper cabinets running the full length of your kitchen, light the sections directly above your work zones: sink, stove, and primary prep area. If you have open shelving or a peninsula, light those surfaces too. A guide to under-cabinet kitchen lighting covers additional aesthetic placement strategies if you want to layer your design approach.
Brightness and color temperature. For task lighting, aim for 400–600 lumens per linear foot of countertop. Higher lumens aren’t always better, overkill creates glare and washes out your countertop colors. For ambient or accent lighting, drop to 200–300 lumens. Color temperature is equally important: warm white (2700K–3000K) flatters wood tones and tile, while cool white (4000K) enhances visibility and works well in contemporary kitchens.
Layering lights. Under cabinet lighting works best when paired with other kitchen lighting. Overhead fixtures or recessed lighting handle general illumination, while under cabinet strips provide focused task light. This layering prevents dark corners and gives you flexibility, you can run just the under cabinet lights for ambient evening mood, or all lights for serious cooking sessions. Dimmer switches amplify this flexibility, allowing you to dial brightness up or down based on the task or time of day. Not all GE models support dimmers, so check specifications if this matters to you.
Avoiding shadows and glare. If your kitchen has white or light-colored walls, some light bounces upward and spreads broadly, great for ambient light. If your walls are darker, light more directly illuminates just the countertop and cabinets above. Test your setup in the afternoon and evening: natural daylight masks installation mistakes that become obvious after sunset. Related approaches to kitchen illumination are discussed in detail on resources covering above sink lighting, which addresses similar functional principles.
Maintenance and Long-Term Value
GE under cabinet LED lighting requires minimal upkeep, one of its biggest advantages. LEDs produce little dust-attracting heat, so buildup is less aggressive than with older technologies. A quick wipe-down every 2–3 months with a dry, lint-free cloth keeps dust off the lens.
Connectors on GE linkable under cabinet lighting systems occasionally loosen if cabinets shift or vibrate (especially if your kitchen sees heavy use). Check connections annually and reseat any loose plugs. Hardwired systems rarely develop connection issues once properly installed.
Lifespan and replacement. GE LED strips typically last 25,000–50,000 hours. In a home kitchen running 3–4 hours daily, that translates to 17–45 years before dimming noticeably. Individual LEDs sometimes fail early due to manufacturing defects (rare but possible), but most GE fixtures come with a 2–3 year warranty covering defects. Keep your receipt and warranty paperwork for peace of mind.
Cost perspective. GE under cabinet LED lighting runs $20–$100 per linear foot depending on the type, length, and features. A typical kitchen might need 12–20 linear feet, putting total materials in the $240–$2,000 range. That’s a solid return on investment: you gain functionality and visual appeal, electricity costs drop compared to incandescent alternatives, and resale appeal typically increases. According to testing and expert reviews on under-cabinet lighting options, GE’s mid-range products consistently balance performance and price without premium-brand markups.
GE under cabinet lighting represents one of the highest-ROI kitchen upgrades a DIYer can tackle. It’s achievable without major carpentry, the result is immediately satisfying, and it sets the stage for other kitchen improvements. Whether you choose simple plug-in strips or a more elaborate hardwired setup, you’re investing in a kitchen that functions better and looks more intentional.
Conclusion
GE under cabinet lighting transforms your kitchen’s functionality and appearance with minimal fuss. Start with your budget and technical comfort level, plug-in LED strips work beautifully for most DIYers, while hardwired systems demand professional help. Measure twice, mount thoughtfully, and choose a color temperature that suits your kitchen’s style and your work habits. The result is a kitchen that’s safer to use, easier on your eyes, and noticeably more inviting from morning to night.


