Table of Contents
ToggleRecessed lighting is one of the cleanest ways to brighten a room without cluttering your ceiling, but the fixture itself is only half the story, the trim is what ties everything together visually. A 4-inch recessed lighting trim sits flush with your drywall and frames the light opening, affecting both how the light spreads and how finished your installation looks. If you’re planning a lighting upgrade or retrofit, understanding trim types and installation basics will save you from costly mistakes and ensure your lights actually perform the way you expect. This guide walks you through the essentials so you can tackle this project with confidence.
Key Takeaways
- A 4-inch recessed lighting trim covers the gap between drywall and the light opening while controlling light distribution and defining your ceiling’s finished appearance.
- Baffle trims narrow the beam and reduce glare for task lighting in kitchens and offices, while reflector trims spread light broadly for ambient room lighting.
- Always confirm your recessed light housing is rated for 4-inch trim before purchasing, as trim sizes are not universal and a wrong fit won’t seat properly.
- Turn off power at the breaker and use a voltage tester before installation; insert the trim by aligning spring tabs with housing slots and push firmly until flush.
- Match trim type to your purpose—use baffles for focused work zones and reflectors for general ambient lighting—and consider finish color and bulb temperature to achieve the desired visual effect.
- Proper spacing of 4-inch trims every 4 to 6 feet in a grid provides even coverage and prevents visible pools of light, while careful planning avoids costly mistakes and do-overs.
What Is 4-Inch Recessed Lighting Trim and Why It Matters
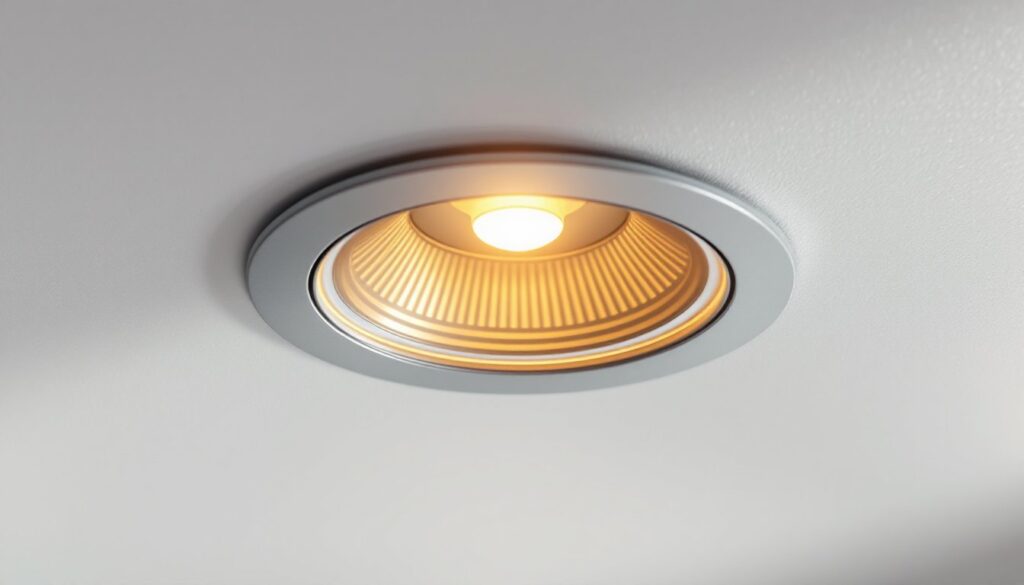
A 4-inch recessed lighting trim is the decorative and functional ring that surrounds the light opening in your ceiling. The “4-inch” dimension refers to the aperture size, the opening where light emerges, not the depth or housing size. The trim serves three critical jobs: it covers the gap between the drywall and the rough opening, it directs light output, and it defines the finished appearance of your ceiling.
Why does trim matter? Different trim styles control light distribution. A baffle trim narrows the beam and reduces glare, making it ideal for task lighting in kitchens or offices. A reflector trim bounces light outward more broadly, working better for ambient lighting in living rooms. Choosing the wrong trim means your carefully planned lighting scheme may feel too harsh, too dim, or poorly proportioned for the space.
Trim also affects your room’s visual weight. Darker finishes (bronze, black) tend to recede and feel more modern: white or chrome finishes pop and draw the eye. Recessed lighting housing is an unsung hero in home design, and the trim you select directly influences how that housing performs and how your ceiling looks overall.
Popular Types of 4-Inch Trim Styles and Finishes
Baffle and Reflector Trims
A baffle trim features a ribbed, cone-shaped insert that sits inside the aperture. It narrows the beam angle (typically 20–40 degrees) and hides the bulb and reflector from view, minimizing glare. This is the go-to choice for kitchens, bathrooms, and task-lit areas. Baffles are available in black or white: black absorbs stray light and feels sleeker, while white provides a softer appearance.
A reflector trim has a smooth, mirrored or semi-polished finish (typically aluminum) that bounces light outward in a wider beam. These are less glare-conscious and work better for spreading light across large open areas. Reflector trims come in finishes like polished aluminum, satin chrome, or white, and they cost slightly less than baffles.
Adjustable and Wall-Wash Options
If your lights won’t stay centered or you need flexibility, an adjustable trim (sometimes called a gimbal trim) tilts up to 35 degrees, allowing you to aim the light where you need it. These are perfect for highlighting artwork, accent walls, or angled ceilings. Just remember that tilting reduces the beam spread and may create visible shadows if not positioned carefully.
A wall-wash trim is purpose-built to graze light along a wall or architectural feature, creating dramatic accent lighting. It typically includes a long reflector that directs light parallel to the wall surface. Wall-wash trims cost more but deliver a professional gallery-like effect if that’s your goal. Recessed lighting options range widely in style and function, so matching trim to your desired effect is essential for the final look.
Step-by-Step Installation Guide for Homeowners
Before you start, confirm that your recessed light housing (the box mounted above the drywall) is rated for a 4-inch trim. Trim sizes are not universal, a 4-inch trim won’t fit a 5.25-inch housing. Check the housing label or consult the fixture specs.
What You’ll Need:
- 4-inch trim (matching your housing brand if possible)
- LED or halogen bulb (confirm wattage limits printed on the housing)
- Needle-nose pliers or a trim removal tool
- Painter’s tape
- Work gloves and safety glasses
Installation Steps:
- Turn off power at the breaker and verify the circuit is dead using a voltage tester. Never work on a live fixture.
- Measure the opening to confirm it’s actually 4 inches (some older fixtures vary slightly). A standard 4-inch aperture is about 4.125 inches actual diameter.
- Inspect the housing. Look for spring clips or fasteners that hold the existing trim. Most 4-inch trims use four small spring tabs that hook into slots in the housing.
- Remove the old trim (if replacing) by gently pulling down and twisting slightly. The bulb will still be installed: don’t jar it.
- Clean the housing opening with a dry cloth to remove dust. This affects light output.
- Insert the new trim by aligning the spring tabs with the housing slots. Push up firmly until the trim sits flush against the drywall. It should feel snug but not forced.
- Install the bulb if not already present. Use the wattage specified on the housing label, oversized bulbs can overheat and trigger thermal cutoffs.
- Restore power and test the light from a distance. Check for gaps, uneven seating, or visible shadows around the trim edge.
Common Mistakes:
Don’t assume older fixtures accept modern LED trims without checking, some vintage housings have proprietary trim systems. Don’t force a trim that doesn’t seat flush: it may be the wrong size or the housing may be slightly tilted. Step-by-step guidance is available from resources like Family Handyman’s recessed light installation guide, which covers trim selection and fitting in detail.
Design Tips for Choosing the Right 4-Inch Trim for Your Space
Match Your Lighting Plan
Ask yourself: Is this task lighting (kitchen island, bathroom vanity) or ambient (living room, bedroom)? Task lighting benefits from baffle trims that control glare and focus the beam. Ambient lighting works better with reflector trims that spread light broadly. Comprehensive recessed lighting guidance suggests layering different trim types, baffles over work zones and reflectors in open areas, for balanced illumination.
Finish and Ceiling Color Matter
A white baffle trim on a white ceiling is nearly invisible, which some love and others find boring. A bronze or black baffle on white creates a subtle shadow-line effect that defines the ceiling plane. Chrome or polished finishes reflect light and add visual interest but can feel cold in warm-toned rooms. Test samples or look at real installations in similar lighting conditions: photos online don’t always capture the effect accurately in your actual space.
Spacing and Scale
Spacing 4-inch trims roughly 4 to 6 feet apart in a grid provides even, shadow-free coverage for general lighting. Closer spacing increases light levels but costs more: wider spacing creates visible pools of light and dark zones. In rooms with cathedral ceilings or unusual layouts, plan the grid before cutting any holes. A sketch or detailed lighting resource helps visualize placement and avoid obstacles like joists and ducts.
Bulb Choice Affects Appearance
The color temperature (warm 2700K vs. cool 4000K) and CRI (color rendering) of your bulb matter as much as the trim finish. A warm 2700K LED in a reflector trim feels inviting: the same bulb in a narrow baffle can look like a spotlight. Dimming capability is worth considering too, many LED bulbs don’t dim smoothly, so confirm compatibility before buying.
Conclusion
Choosing and installing a 4-inch recessed lighting trim is manageable for a confident DIYer, but it’s not mindless. The right trim controls light, defines your ceiling’s visual impact, and ensures your lighting performs as intended. Take time to assess your space, compare trim types side-by-side if possible, and verify compatibility before you buy. A small investment in planning prevents costly do-overs and delivers a polished result that looks and functions like a professional install.


